What is a DNS Server?
The Domain Name System (DNS) is the phonebook of the Internet. When users type domain names such as ‘google.com’ or ‘nytimes.com’ into web browsers, DNS is responsible for finding the correct IP address for those sites. Browsers then use those addresses to communicate with origin servers or CDN edge servers to access website information. This all happens thanks to DNS servers: machines dedicated to answering DNS queries.
Installation
Step 1. Update System
sudo apt-get update

sudo apt-get upgrade

sudo apt-get dist-upgrade
Step 2. Install DNS Package
Use the following command:
sudo apt-get install bind9
Once you execute the previous command it will suggest some other packages to be installed, press y to confirm downloading and installing those packages.
Step 3. Install DNS Utilities
Another useful package that will help you a lot in troubleshooting and testing the DNS issues is the dnsutils package that can be installed using the next command:
sudo apt-get install dnsutils
Note that you may find it installed already.
Step 4. DNS Configuration
Usually, you can find the DNS configuration files stored in /etc/bind directory. /etc/bind/named.conf is the master configuration file that contains the DNS options and it’s highly recommended that you should be careful while editing it.
Step 5. Configuring NameServer
The most used and default configuration is using your server as a caching server. This means that the DNS will get the answer to name queries, cache it and use the answer again when the domain is queried for another time. So, to use your server as a caching nameserver you can follow the next few steps.
Open and edit the /etc/bind/named.conf.options with your favorite editor.
sudo nano /etc/bind/named.conf.options
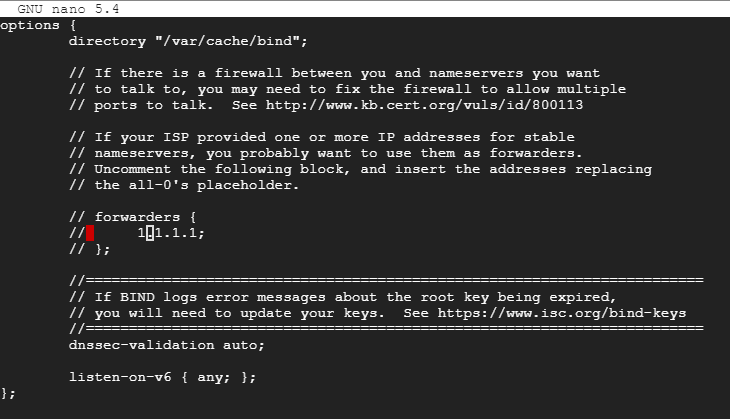
Add the following block to it, here we have used Cloudflares's DNS.
forwarders {
1.1.1.1;
};
The file should look like this:

To enable the new configurations you should restart the DNS service:
sudo systemctl restart bind9
To test your query time we can use the dig command which is installed by the dnsutils package:
dig google.com
Execute the previous command twice and check for the query time, the output should look like that:
; <<>> DiG 9.16.8-Ubuntu <<>> google.com
;; global options: +cmd
;; Got answer:
;; ->>HEADER<<- opcode: QUERY, status: NOERROR, id: 10240
;; flags: qr rd ra; QUERY: 1, ANSWER: 6, AUTHORITY: 0, ADDITIONAL: 1

;; OPT PSEUDOSECTION:
; EDNS: version: 0, flags:; udp: 65494
;; QUESTION SECTION:
;google.com.                    IN      A

;; ANSWER SECTION:
google.com.             285     IN      A       142.250.125.138
google.com.             285     IN      A       142.250.125.100
google.com.             285     IN      A       142.250.125.102
google.com.             285     IN      A       142.250.125.113
google.com.             285     IN      A       142.250.125.101
google.com.             285     IN      A       142.250.125.139

;; Query time: 8 msec
;; SERVER: 127.0.0.53#53(127.0.0.53)
;; WHEN: Sun Sep 26 12:53:36 UTC 2021
;; MSG SIZE  rcvd: 135
You will notice that the query time for the second time you had executed the command is nearly zero.
Step 6. Primary Master
For a primary master server configuration, the DNS gets the data for a zone from a file stored on its host. Also, the DNS has control for that zone. Now let’s say we have a domain called “example.com” we are going to configure the DNS to be the primary master for that domain.
Forward Zone File
Here in the forward zone, the name will map to the IP.
Step 1. Step 1. Open and edit the /etc/bind/named.conf file.
sudo nano /etc/bind/named.conf
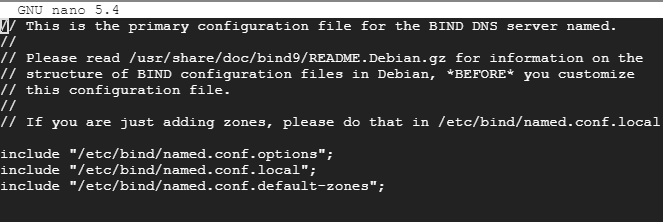
Ensure that it contains the following lines and NOT commented:
include “/etc/bind/named.conf.options”;
include “/etc/bind/named.conf.local”;
include “/etc/bind/named.conf.default-zones”;
The file should look like that:

Step 2. Open and edit the /etc/bind/named.conf.local file to add a DNS zone.
sudo nano /etc/bind/named.conf.local
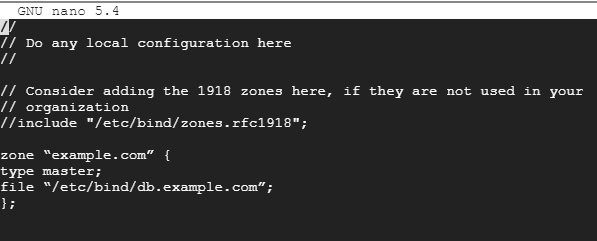
Add the following block to it:
zone “example.com” {
type master;
file “/etc/bind/db.example.com”;
};
The file should look like this:

Step 3. Create a zone file from the template one.
sudo cp /etc/bind/db.local /etc/bind/db.example.com
Step 4. Now open the new example zone file.
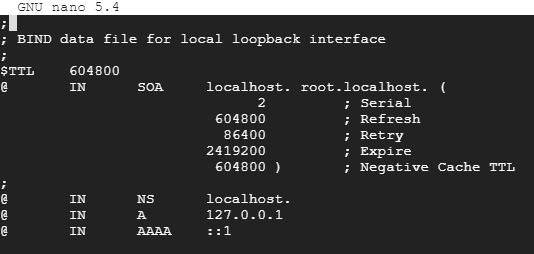
sudo nano /etc/bind/db.example.com
And change it to look like this:

Please note that you have to increase the Serial Number every time you make changes to the zone files.
Step 5. Restart DNS Service to apply changes.
sudo systemctl restart bind9
## Step 7. Configuration Files Verification
Now and after performing all the previous configurations we need to verify all the configurations are correct.

Step 1. Execute the following commands to check if it will return any errors.
named-checkzone example.com /etc/bind/db.example.com
named-checkzone 192.168.0.0/32 /etc/bind/db.10
named-checkconf /etc/bind/named.conf.local
named-checkconf /etc/bind/named.conf
Note that you may have a different serial number, so do not panic.

---

If you found this usful then please share this and follow me! Also check out [my website where I also post everything from here](https://howtoubuntu.xyz)
